Performing Common FCI Maintenance Tasks
Introduction
In this lab, you will perform typical maintenance tasks for a SQL Server AlwaysOn Failover Cluster Instance (FCI).
Objectives
At the end of this lab, you will be able to:
- Find information about SQL Server FCI
- Change the IP address of SQL Server FCI
- Add a new disk to SQL Server FCI
Estimated Time
20 minutes
Logon Information
Before Login make sure windows has Applied Computer Setting to all nodes.
Use the following credentials to login into virtual environment
Connect to AlwaysOnClient as Corpnet\Cluadmin using Pa$$w0rd as the password.
Click the Type Text icon to enter the associated text into the virtual machine.
Connect to AlwaysOnN1 as CORPNET\Administrator using Pa$$w0rd as the password.
Click the Type Text icon to enter the associated text into the virtual machine.
Connect to AlwaysOnN2 as CORPNET\Administrator using Pa$$w0rd as the password.
Click the Type Text icon to enter the associated text into the virtual machine.
Connect to AlwaysOnN3 as CORPNET\Administrator using Pa$$w0rd as the password.
Click the Type Text icon to enter the associated text into the virtual machine.
Connect to AlwaysOnDC as Administrator using Pa$$w0rd as the password.
Click the Type Text icon to enter the associated text into the virtual machine.
Change the screen resolution if required.
You may want to adjust the screen resolution to your own preference. Do this by right-clicking on the desktop and choosing Screen resolution and clicking OK when finished.
Lab Environment
Before we begin with the first exercise in the lab, let's review the lab environment.
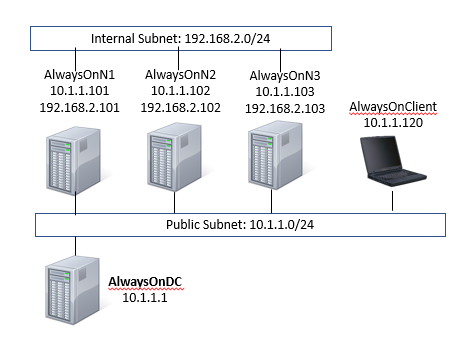
- In the lab, we have one Domain Controller, 3-node Windows Server 2022 cluster and one Windows 10 client computer.
- AlwaysOnN1 and AlwaysOnN2 nodes are in the primary Datacenter.
- AlwaysOnN3 is in the secondary datacenter.
- For this lab, both the datacenters are in the same subnet.
- SQL Server 2022 FCI (SQLFCI\INST1) is installed on AlwaysOnN1 and AlwaysOnN2
Exercise 1: Find information about SQL Server FCI
You are a new SQL Server DBA. You need to administer several SQL Server instances with very little information about them. Before you can administer these SQL Server instances, you want to find out some basic information such as:
- Are the SQL Server instances clustered or standalone?
- If they are clustered, determine:
- Which node the instance is currently running on?
- Which nodes the instance can run on?
- Which shared disks this instance can access?
- The current settings for the SQL Server cluster resource.
Task 1: Review information about SQL Server FCI
Perform this task on virtual machine AlwaysOnClient as logon user CORPNET\cluadmin using the password Pa$$w0rd.
Click the Type Text icon to enter the associated text into the virtual machine.
From the taskbar, open SQL Server Management Studio and connect to the SQL Server failover cluster instance SQLFCI\INST1
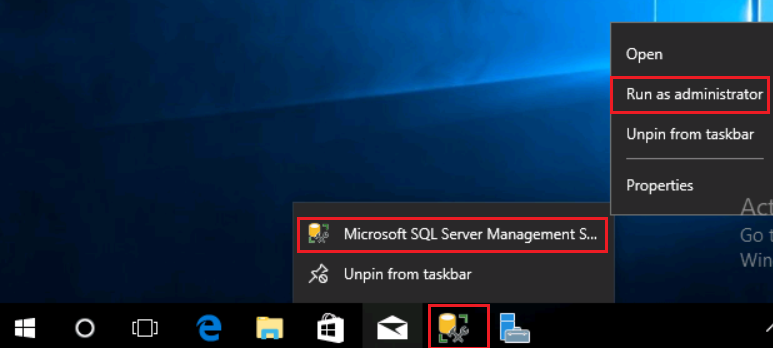
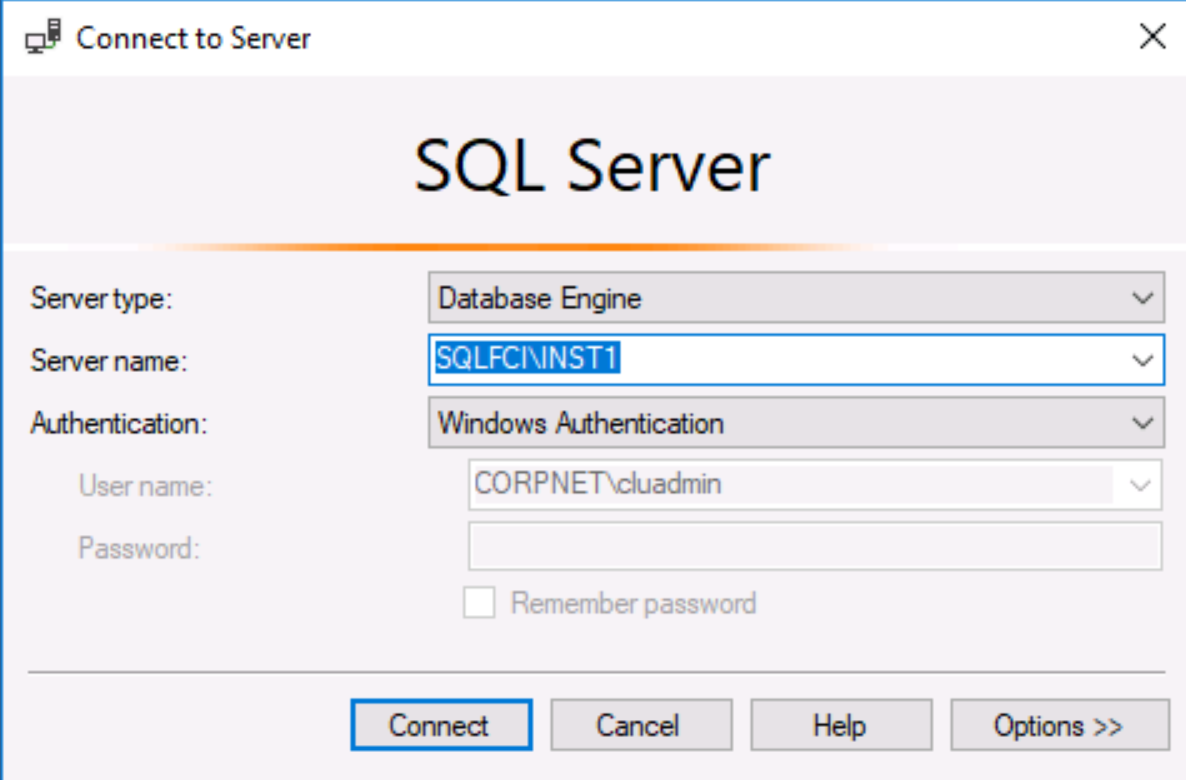
Open New Query window and type the following commands:
Open Notepad in the lab environment VM. Use the Type Text feature to enter the code into Notepad, copy the code, and then paste it into the Query Editor. This will bypass the autocomplete features in the Query Editor.
The edition and version of SQL Server.
TSQLSELECT @@VERSION;
SELECT SERVERPROPERTY('ProductVersion') AS ProductVersion, SERVERPROPERTY('ProductLevel') AS ProductLevel, SERVERPROPERTY('Edition') AS Edition;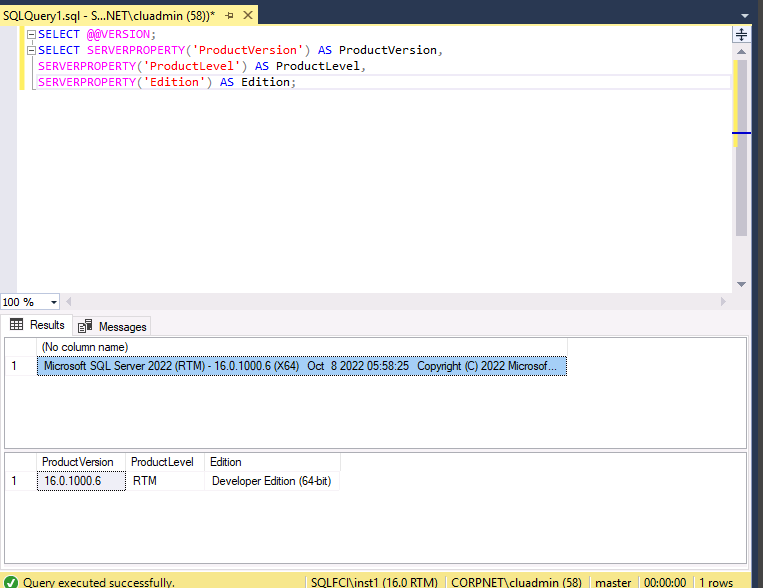
Is the current SQL Server instance clustered?
TSQLSELECT SERVERPROPERTY('IsClustered');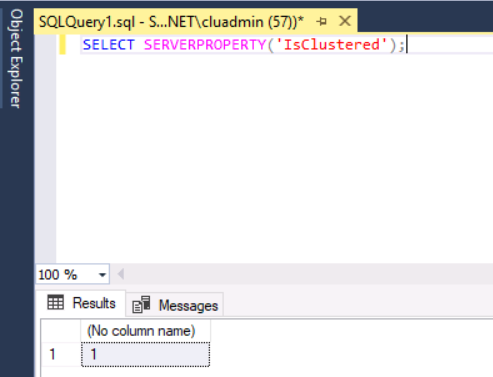
If the current instance is clustered, the query returns a value of 1. Otherwise, it returns a value of 0.
Which node is the instance currently running on?
SQLQuerySELECT SERVERPROPERTY('ComputerNamePhysicalNetBios');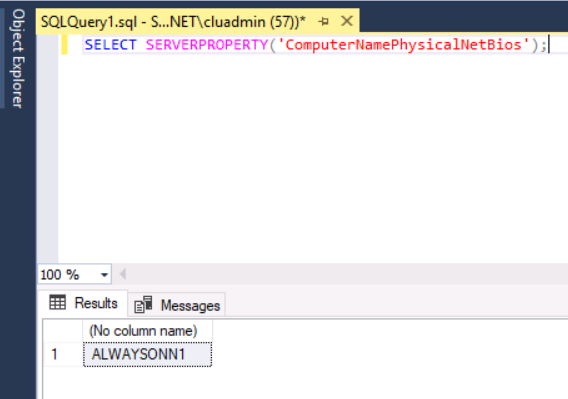
On which nodes can the instance run on?
TSQLSELECT NodeName, status, status_description, is_current_owner FROM sys.dm_os_cluster_nodes;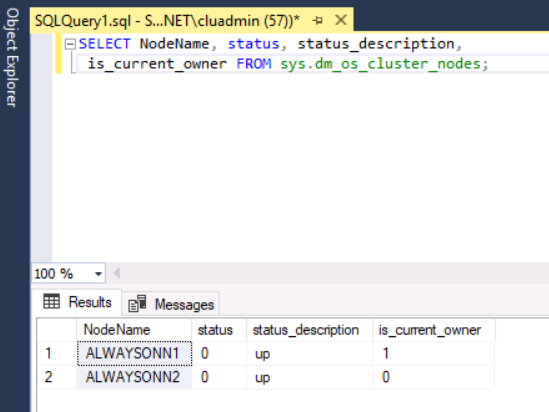
Which shared disks can this instance access?
TSQLSELECT * FROM sys.dm_io_cluster_shared_drives;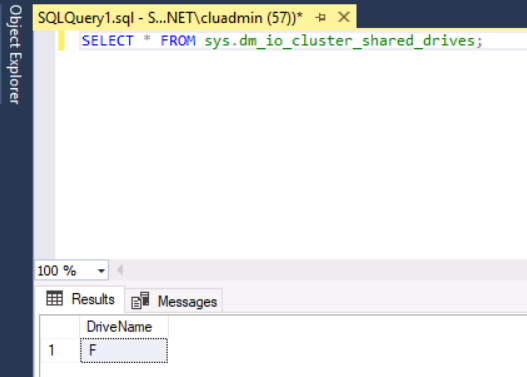
The flexible failover settings for the SQL Server cluster resource.
TSQLSELECT FailureConditionLevel, HealthCheckTimeout
FROM sys.dm_os_cluster_properties;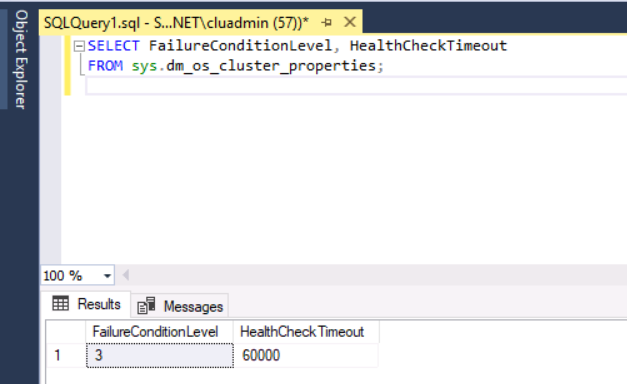
Congratulations!
You have successfully completed this exercise. Click Next to advance to the next exercise.
Exercise 2: Change the IP Address of SQL Server FCI
You are an SQL Server DBA who needs to change the IP address of an SQL Server AlwaysOn FCI from 10.1.1.202 to 10.1.1.212
To perform this exercise, you need to schedule a downtime. You can change the SQL Server IP address, but the change does not take effect until the SQL Server IP Address resource restarts. This means that SQL Server will become offline, and clients will be disconnected while the resource restarts.
Task 1: Change the IP Address of the SQL Server FCI
Perform this task on virtual machine AlwaysOnN1 as logon user CORPNET\cluadmin using the password Pa$$w0rd.
Open Failover Cluster Manager.
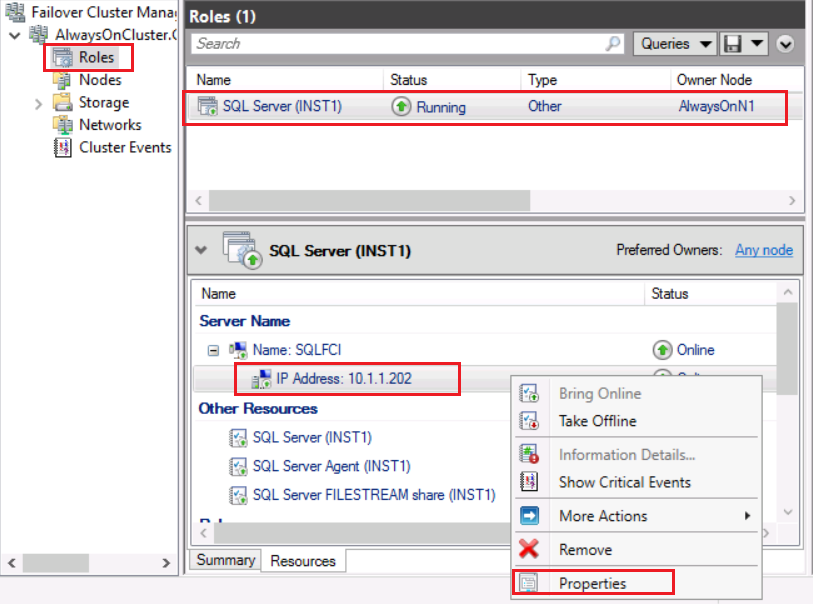
Check the Owner Node for SQL Server (INST1). If it is AlwaysOnN1 as shown below then continue to next step. If the Owner Node is AlwaysOnN2 then right-click SQL Server (INST1) and select Move > Select Node > AlwaysOnN1.

Right-click the SQL Server IP Address resource and then click Properties.
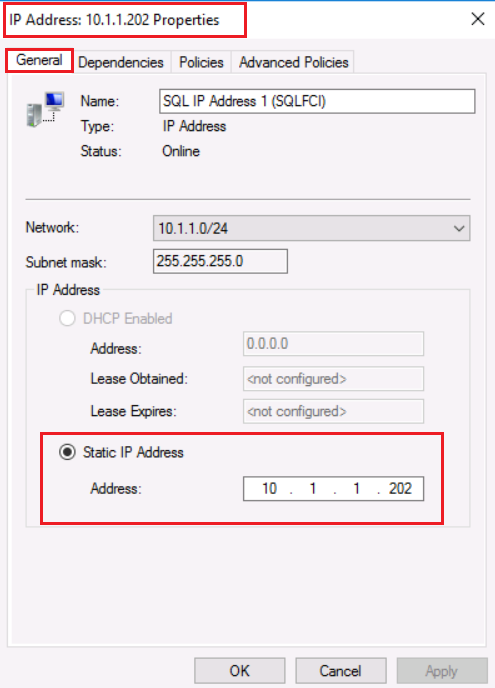
Click the General tab.
In Static IP Address, notice that the address is 10.1.1.202.
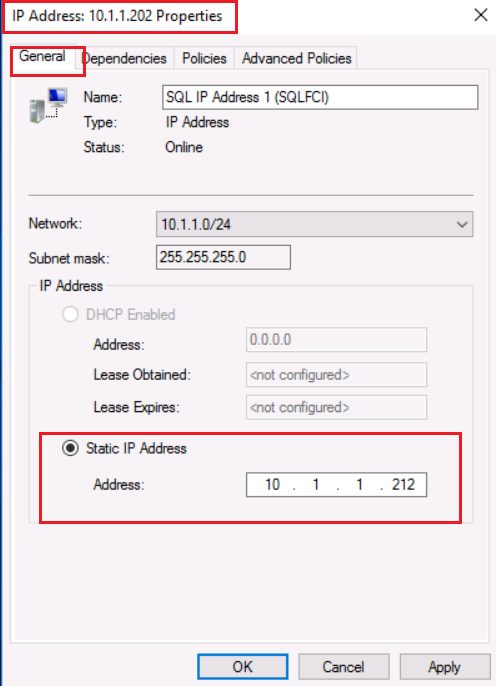
Change the address to 10.1.1.212. Click Apply.
A message appears that says, "The properties were stored, but not all changes will take effect until IP Address: 10.1.1.202 is taken offline and then online again. Would you like to do this now?
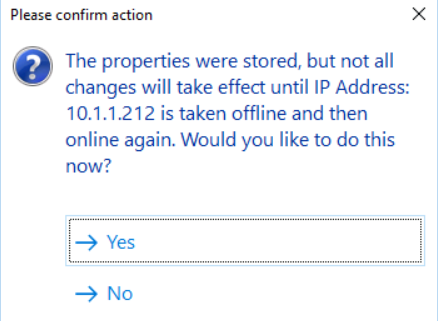
Click Yes if:
You are performing this operation during a maintenance window, and
You can take the SQL Server resource offline. (If you take the IP address offline, you also take the SQL Server resource offline, because SQL Server depends on it.)
After the operation is finished, a message appears that says, "IP Address: 10.1.1.212 is back online." Click OK.

On the IP Address Properties page, click OK.
It may take more than 30 minutes for changes to the IP address to propagate through a corporate network. You might want to flush the DNS cache for each client and server that is accessing the SQL server that had its IP address changed.
To flush the DNS cache, from a Command Prompt window, run ipconfig/flushdns and ipconfig/registerdns.
Alternately, you can change the IP address of the SQL Server by running the following PowerShell commands on AlwaysOnN1.
Start an elevated Windows PowerShell, and then in the UAC dialog box, click Yes.
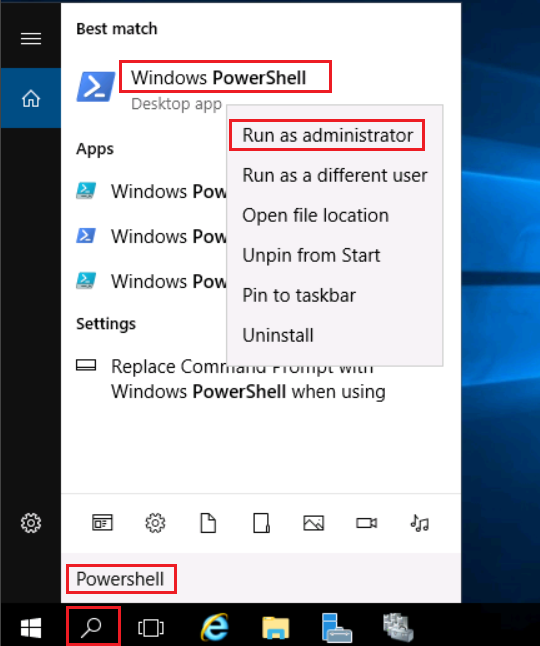
In Windows PowerShell, type the following commands and press Enter after each one:
PowerShellImport-Module FailoverClusters
Get-ClusterResource
Get-ClusterResource “SQL IP Address 1 (SQLFCI)” | Set-ClusterParameter Address 10.1.1.212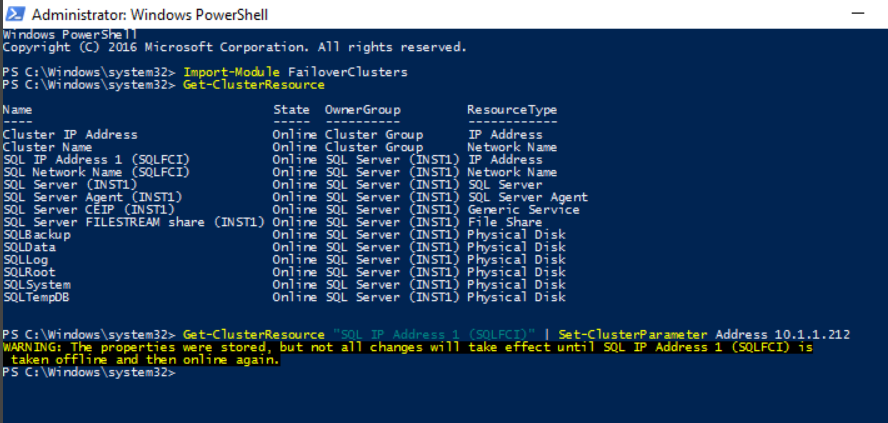
Task 2: Verify that the IP Address changed
Perform this task on virtual machine that owns the SQL Server FCI as logon user CORPNET\cluadmin using the password Pa$$w0rd
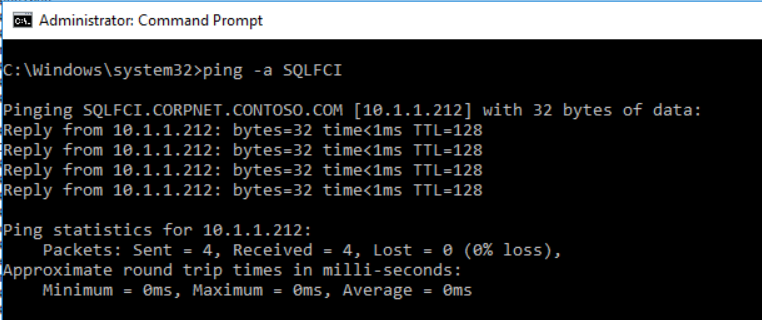
Ping the SQL Server network name (SQLFCI) and verify that it returns the new IP address (10.1.1.212).
Open the SQL Server Error Log. (F:\SQLSystem\MSSQL16.INST1\MSSQL\LOG\Errorlog) using Notepad.

Verify that the new IP address is listed, by searching for Server is listening on, and then close Notepad.
Congratulations!
You have successfully completed this exercise. Click Next to advance to the next exercise.
Exercise 3: Add a new disk to SQL Server FCI
A new disk has been added to the cluster nodes. You are an SQL Server DBA who needs to add the new disk to an SQL Server FCI. In this exercise, you will add a new disk to the SQL Server AlwaysOn FCI.
Task 1: Initialize and format the newly assigned disk
Perform this task on virtual machine AlwaysOnN1 as logon user CORPNET\cluadmin using the password Pa$$w0rd.
In Server Manager, click Tools > Computer Management.

In Computer Management, click Storage > Disk Management. Make sure that a new disk is presented to you as shown below.
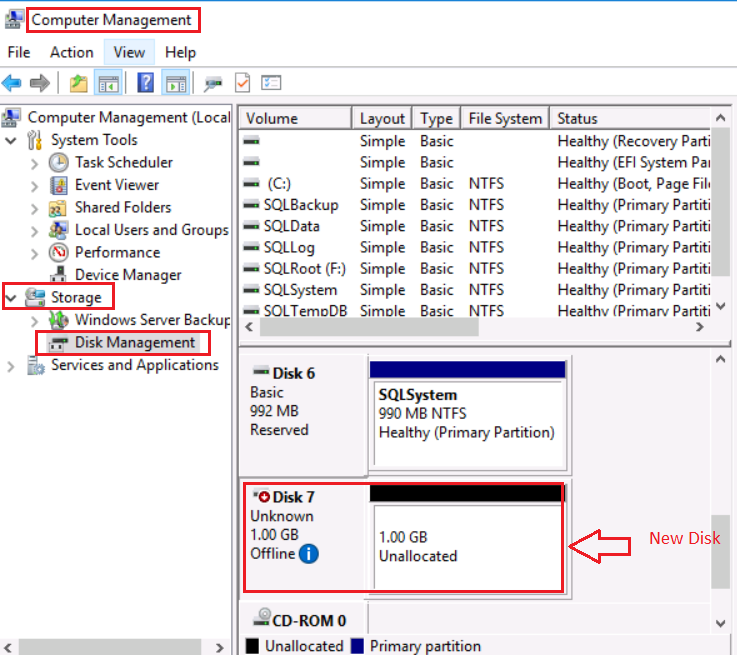
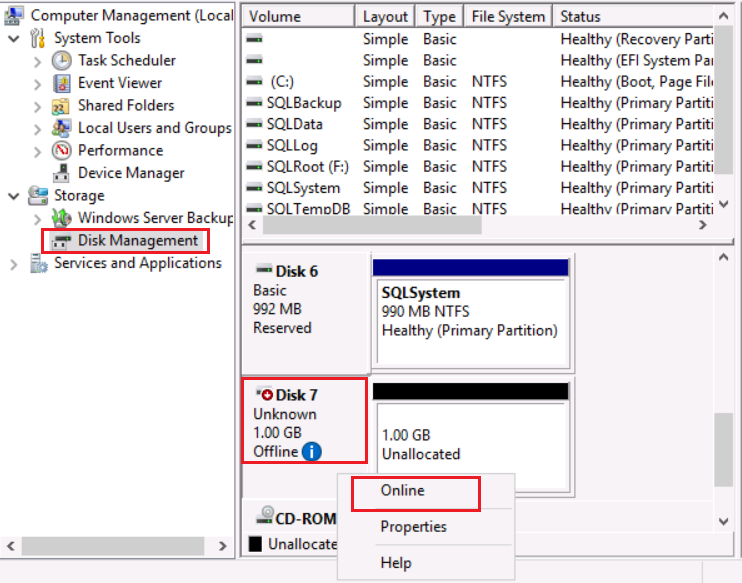
To Create New volume, right click in the left-hand corner, click Online.
Once again right click on that partition (in the left-hand corner) and click Initialize Disk and click OK on the Initialize Disk window.
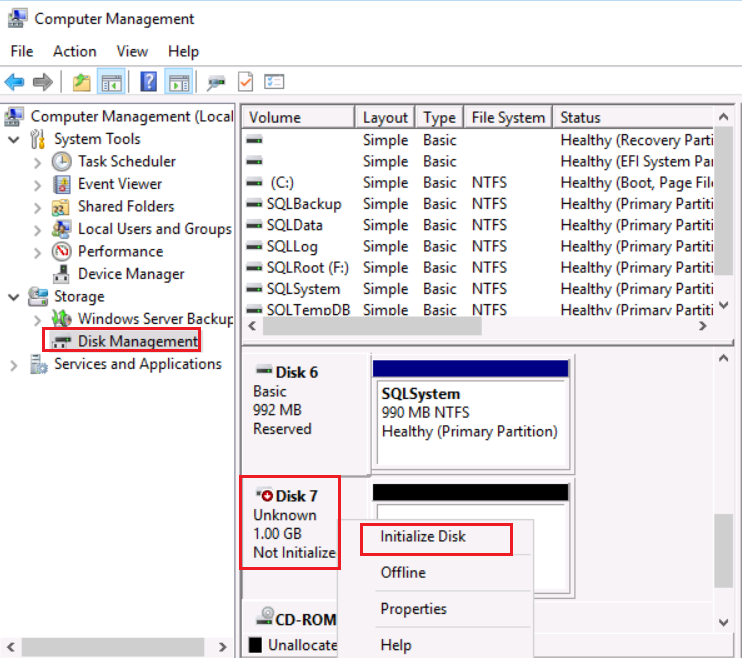
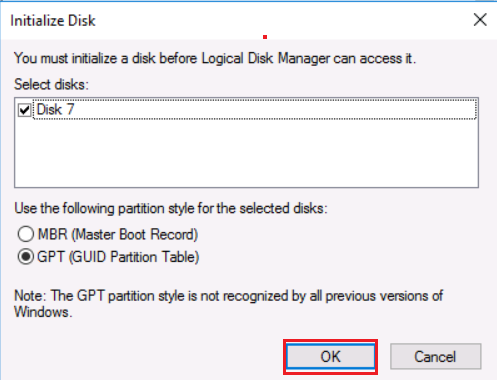
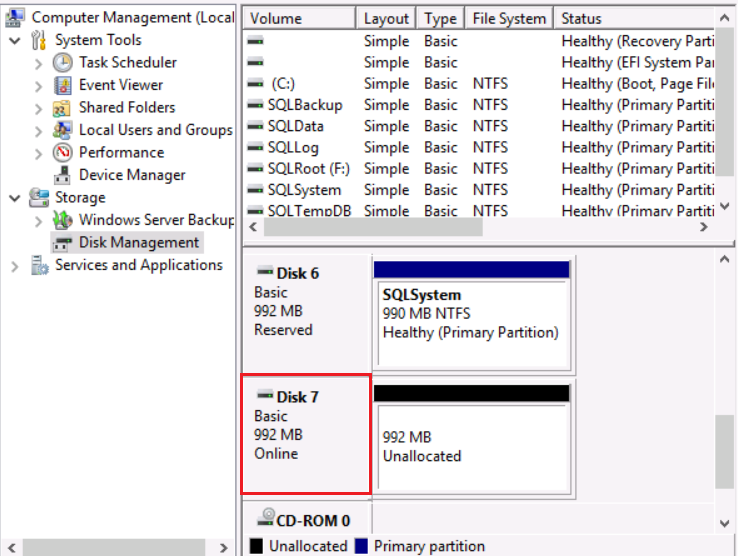
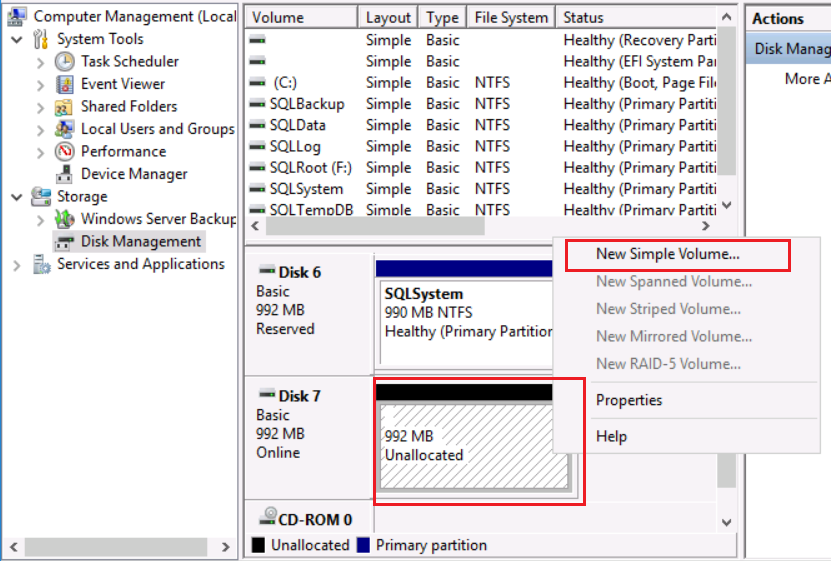
Right click on that drive, click New Simple Volume.
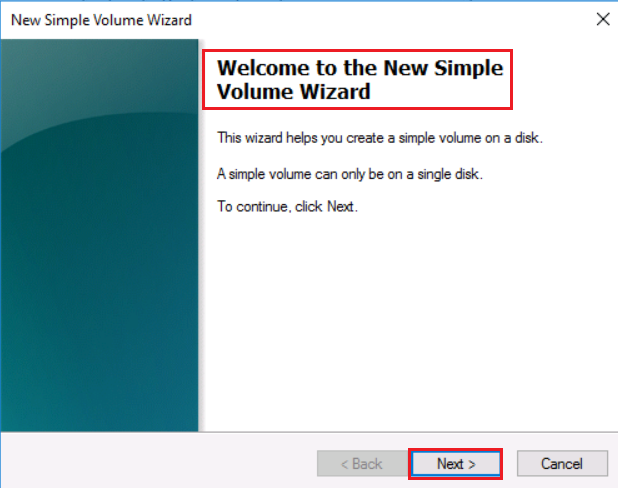
The New Simple Volume Wizard will open. Click Next.
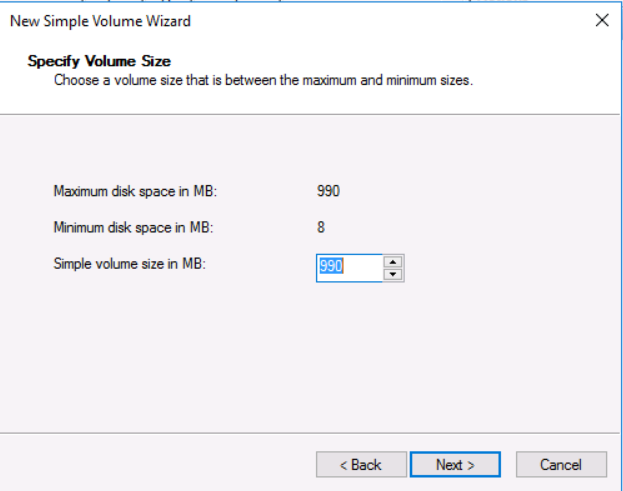
On the Specify Volume Size page, review the information, and then click Next.
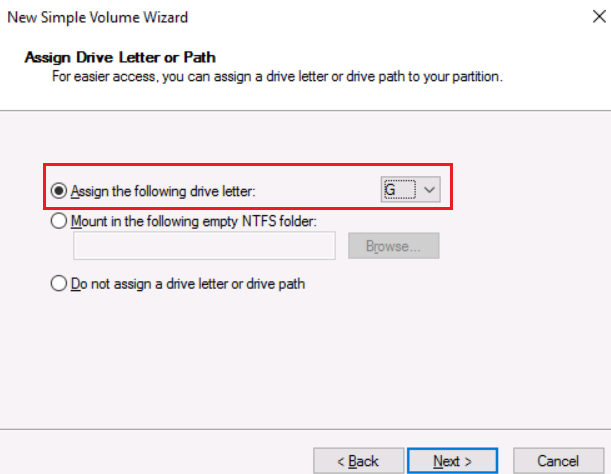
On the Assign Drive Letter or Path page, select "Assign the following drive letter", then select your drive letter (G:) and click Next.
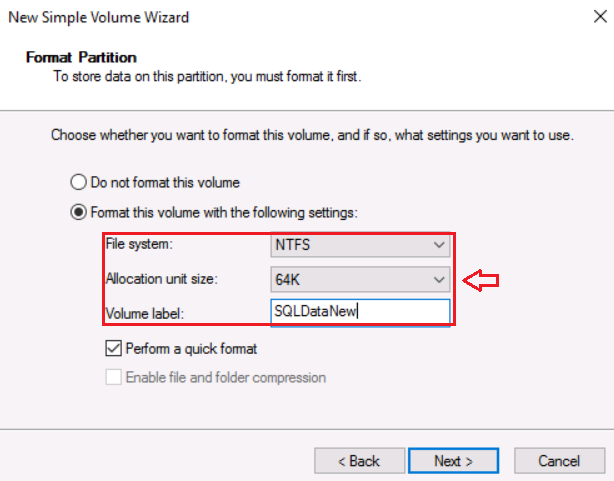
On the Format Partition page, choose format this volume with the following settings, and type your volume label SQLDataNew, and then click Next.
Recommended "Allocation unit size" for SQL drives is 64K.
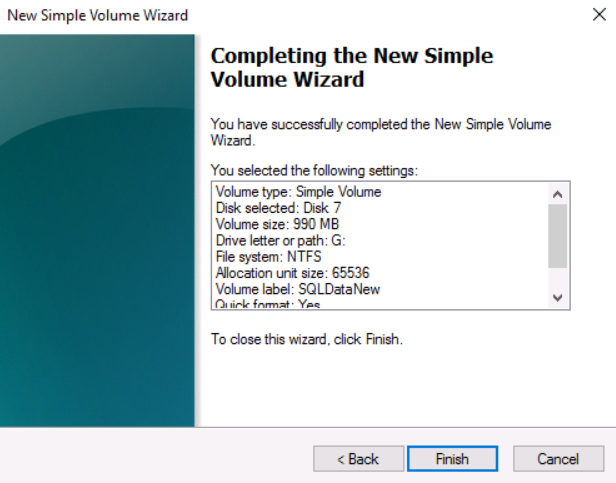
Click Finish to create a new partition in the hard disk drive.
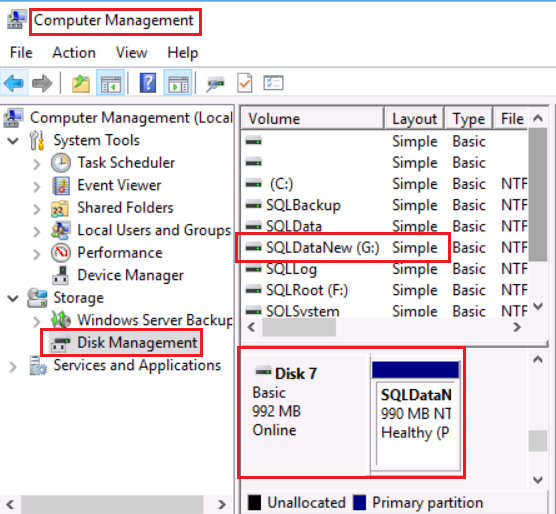
You have successfully initialized and formatted the new disk.
Task 2: Add the new disk to SQL FCI
Perform this task on virtual machine AlwaysOnN1 as logon user CORPNET\cluadmin using the password Pa$$w0rd.
In Failover Cluster Manager, expand Storage. Right-click Disks, and then click Add Disk.
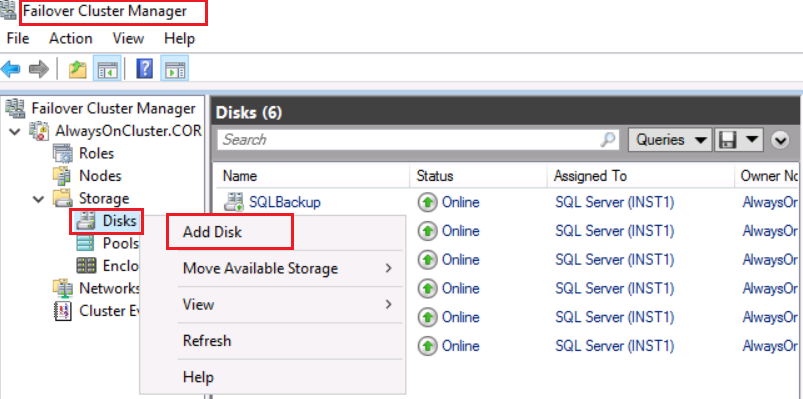
On the Add Disks to a Cluster page, click the disk that you want to add.

Click OK. The disk now appears in Available Storage.
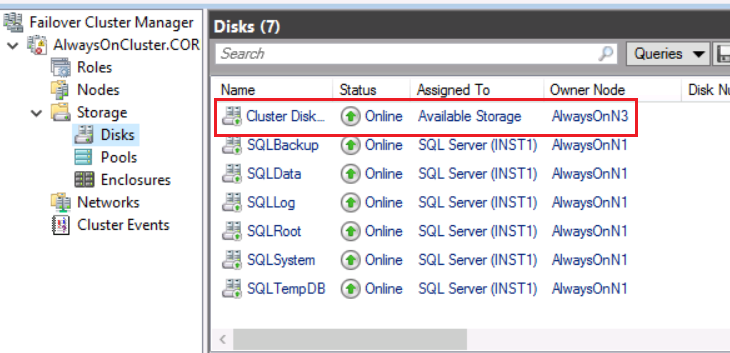
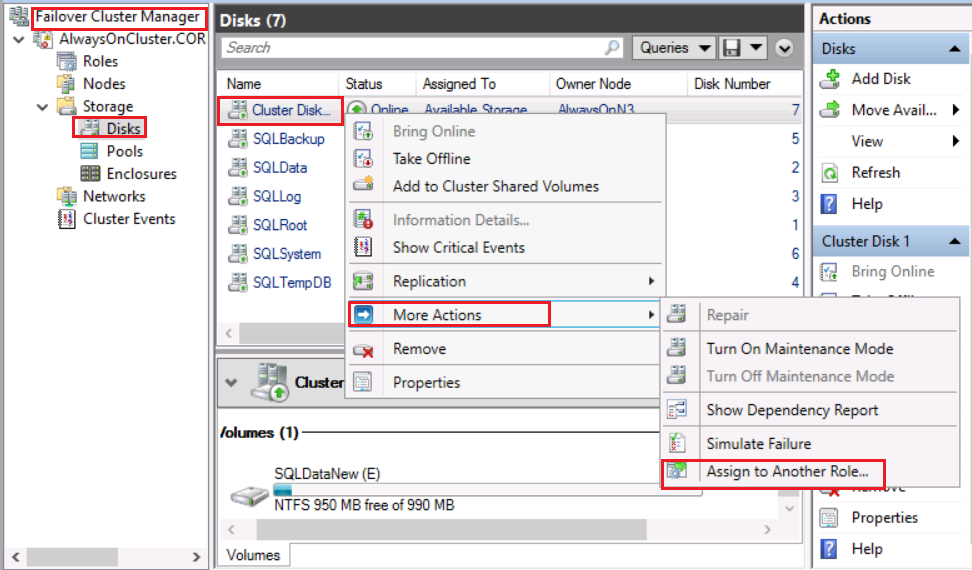
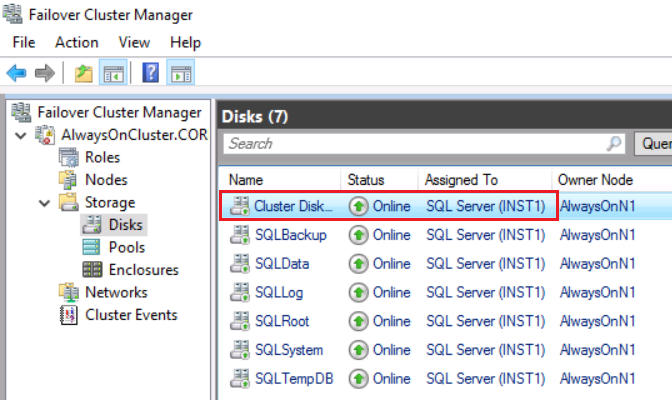
In Storage, right-click the new disk label that begins with Cluster Disk…, click More Actions > Assign to Another Role...
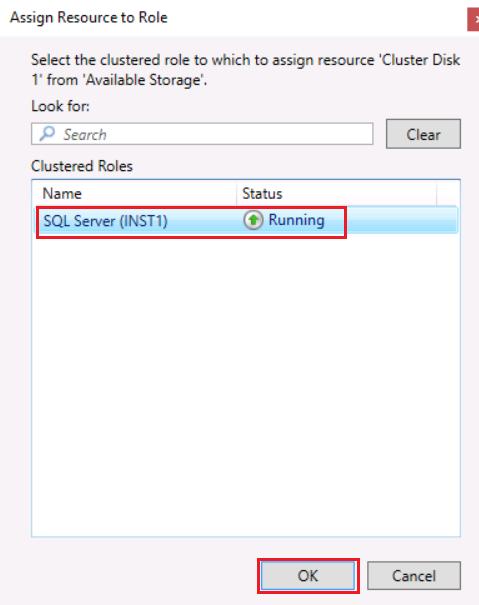
On the Assign Resource to Role page, click the SQL Server service group that you want to add the new disk to and then click OK.
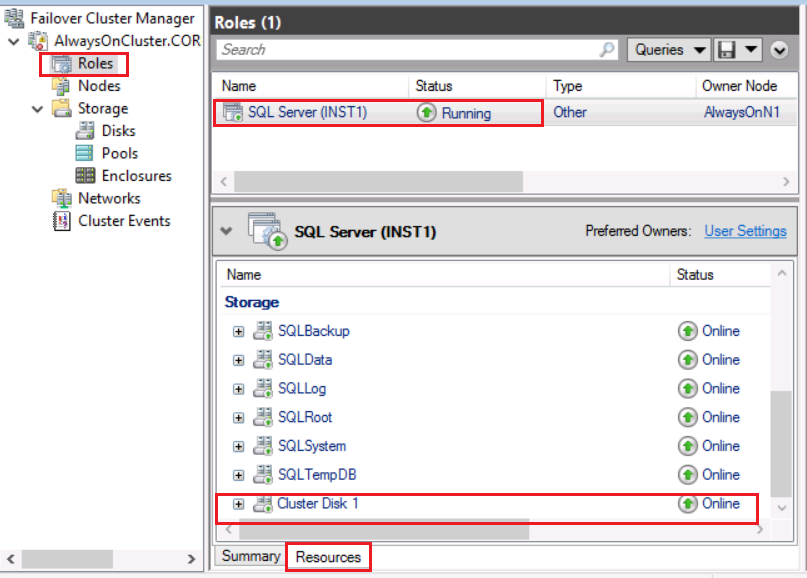
Click Roles and then select SQL Server (INST1) role. Click the Resources tab. You should now see the new disk listed as shown below.
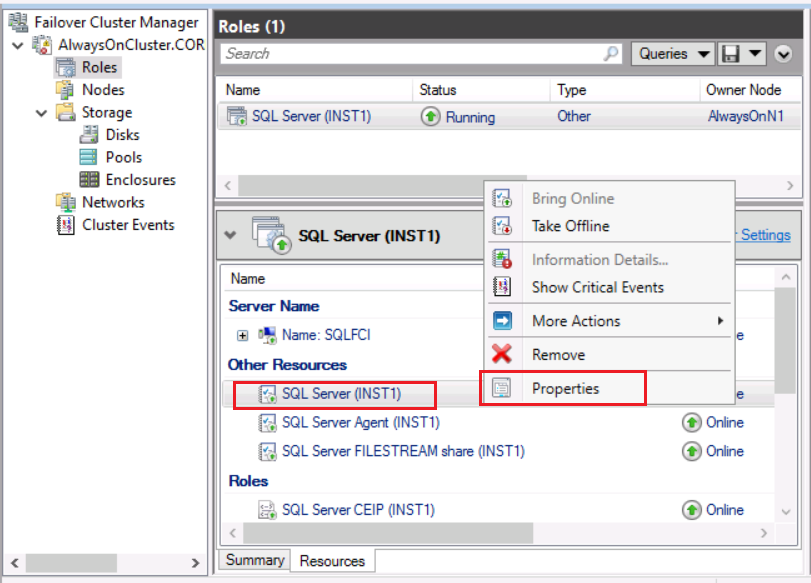
Right-click the SQL Server (INST1) resource, click Properties.
Click the Dependencies tab.
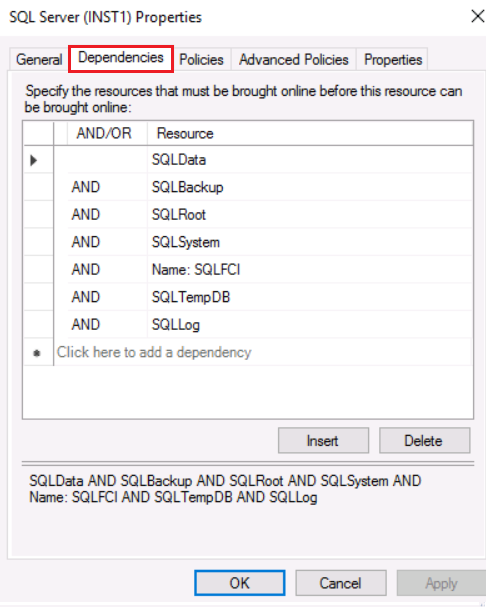
Select Click here to add a dependency. In the AND/OR dropdown list, click AND. In the Resource dropdown list, click the newly added disk and click OK.
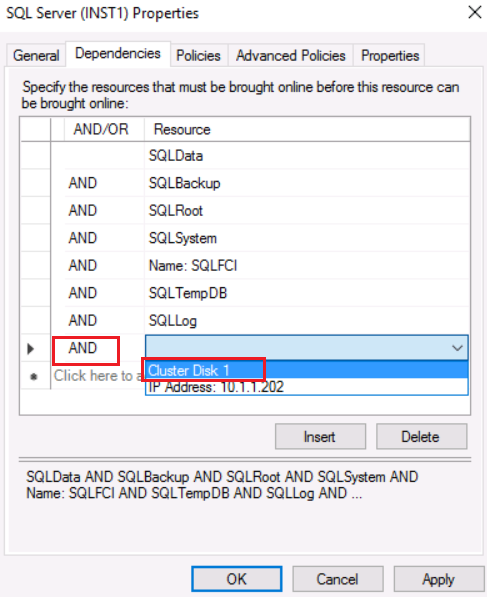
You have successfully added the new disk to SQL FCI.
Task 3: Verify that the new disk is added properly to the SQL Server FCI
Perform this task on virtual machine AlwaysOnClient as logon user CORPNET\cluadmin using the password Pa$$w0rd.
Open SQL Server Management Studio.
Connect to the SQL Server instance (SQLFCI\INST1).
If your connection fails, open a command prompt and run IPCONFIG /FLUSHDNS
Open a New Query and run the following command to verify that the disk is added properly to the SQL Server resource:
TSQLSELECT * FROM sys.dm_io_cluster_shared_drives;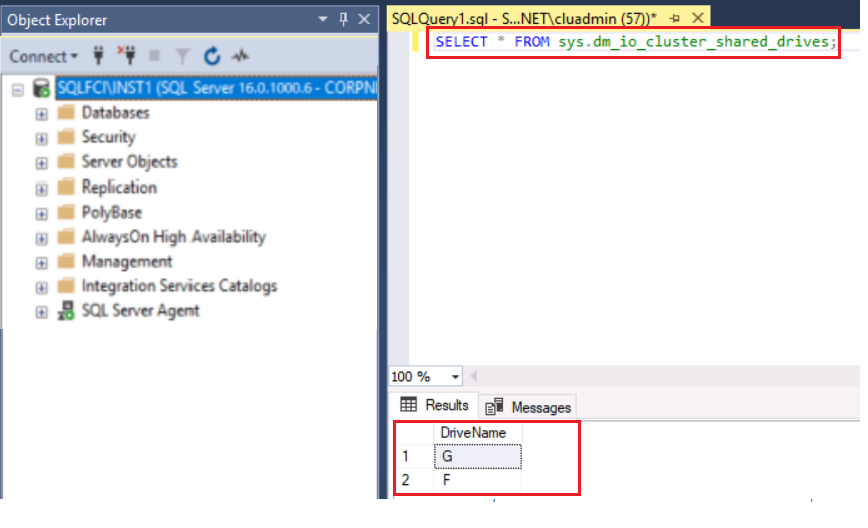
Congratulations!
You have successfully completed this exercise. You can move to the next lab.